Unity 2D Animation with Fancy Lighting!
aka Unity 2D + Normal Maps
This is more of a devlog than a tutorial but if you're relatively familiar with Unity 3D maybe this will help with something. I posted this on my cohost blog at first but I'm crossposting all my devlogs here and there. With that out of the way, let's begin...
I want T-SOL to have a strong sense of atmosphere. A big part of that, I feel, is lighting. A second part of that is animation.
Unity has a decent though not amazing system for doing 2D skeletal animation called, creatively, 2D Animation. Export your character art as a Photoshop file broken into layers for stuff like arms, legs, hair etc. Add a skeleton and you can animate it to your heart's content. Exporting PSD files from GIMP has worked just fine for me so far. I'm quite happy to have a relatively effective tool that I don't need to pay for. I want to make my main character, Saul, expressive without having to draw literally hundreds of sprites and I feel this will give a good balance between detail and time/effort.
Additionally, Unity's URP rendering system also provides a nice selection of different 2D specific lights that look pretty good out of the box. Unlike the standard 3D lights it's possible to set up lit spaces with pretty much any size or shape. They're working great for me so far!
The only negative is that, since I'm working with sprites, the lighting is relatively flat. Meaning, everything looks like it's a sheet of paper with a light shining on it. It's certainly possible to draw characters with shading to give them some form of depth. However, that can end up looking quite weird if the character looks like it's lit from one side and the actual light source is on the other. Once I decided to start using fancy 2D lights I also decided to mostly stop shading my characters and map art. I had (I hoped) a better solution.
That solution is triumphant fanfare Normal Maps. A normal map is a special image that uses colors to indicate what direction a pixel (pedants sit down please) is facing. URP's 2D lighting supports normal maps so I figured that's an easy way to add shading to my characters and have it always match with the lights in the game. Normally this is done by adding a "secondary texture" to the sprite. Doing this with a 2D animated character has problems which I'll get to later.
The first real problem I had though was creating the normal maps. In 3D this is straightforward. Make a high polygon model of the character. Your modelling tool will have a way of rendering that into a normal map which can then be applied to a lower polygon version of the same model. Sprites that aren't rendered from 3D models don't have that luxury. What I did instead was made a height map. A greyscale copy of the sprite where brighter shades are "higher up" than darker ones. In Unity I can then import it as a normal map then check "Create from Greyscale" to convert it into a proper normal map.
The second problem is with normal mapping 2D skeletal animated characters specifically. While I can use the usual method to assign a normal map to a Photoshop based sprite Unity doesn't know how to actually break that file into a sprite sheet like it does for the character. Instead it tries to apply the normal map directly to the sprite sheet without moving the layers around. The result is a mess.

None of the normal maps line up where they should on the character sprite
What I needed to do was export (read: Print Screen then paste) the sprite sheet Unity generates from the Photoshop file's layers. I then use that to generate my heightmap. It took some adjustment due to scaling screwups on my part but eventually I got a working normal map. I would love to find (or make) a better way of doing this since it's an annoying, unreliable, process.
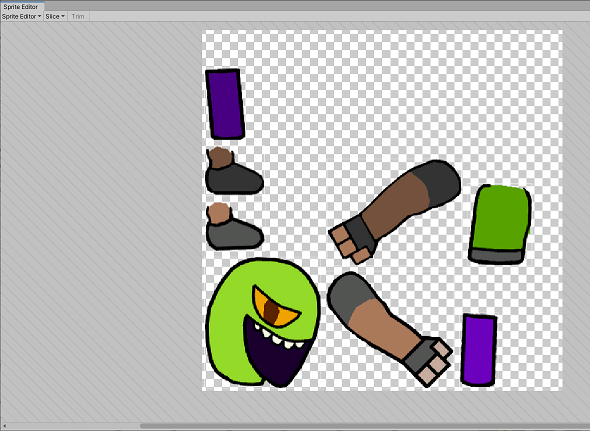
I had to take a screenshot of this to make the normal map. There's got to be a better way!
The final issue is that the normal map was, in a word, bumpy. Each shade of grey seemed to produce noticeably different normals. At best the result looked like a series of terraces on a mountain. At worst it looked like a grotesque claymation abomination. There were lots of weird dimples all over the character. Smoothing/blurring the height map helped a bit but the dimples persisted. The actual fix turned out to be to enable mip mapping of the normal map. The weird lumpiness was not just due to abrupt difference in shade. It was also, apparently, caused by scaling issues with the normal map texture. You can see the final result below. Not bad IMO.
Look at that lovely shadow moving!
Leave a comment
Log in with itch.io to leave a comment.